 Merken
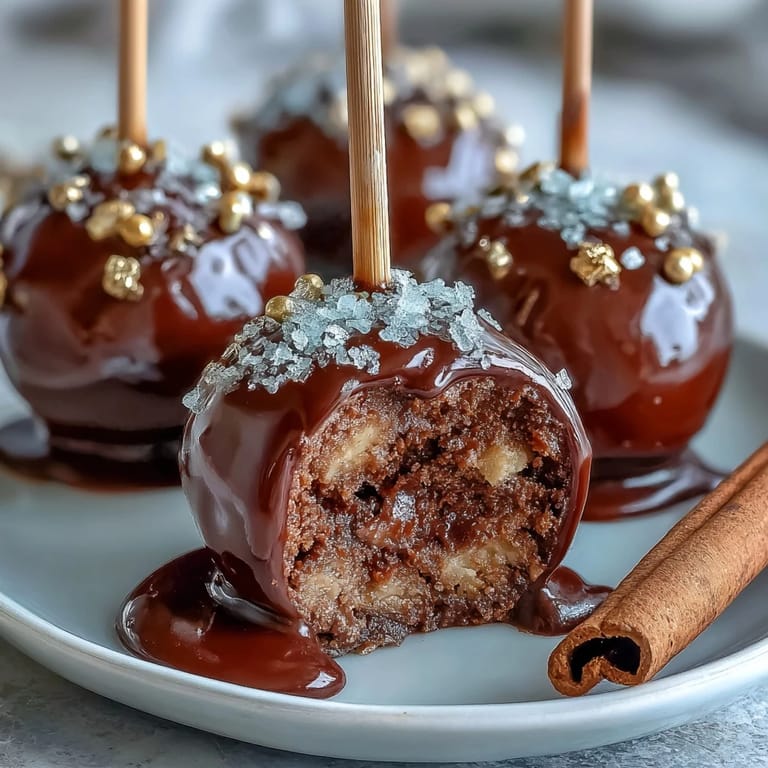
 My neighbor showed up at my door last March with a box of these gleaming chocolate pots, each one crowned with edible gold, and I was absolutely enchanted. She laughed at how seriously I examined them before eating one, as if they were tiny edible jewels rather than cake. That first bite of rich chocolate coating giving way to the soft cake and frosting inside felt like finding actual treasure, which I suppose was the whole point. Now every St. Patrick's Day, I make a batch not because I'm particularly Irish, but because watching people's faces light up when they realize these little pots are filled with something delicious never gets old.
I'll never forget my daughter's fifth birthday party when I served these alongside regular cupcakes, and every single child asked for the "pot of gold" first. One kid actually tried to find a rainbow leading to them, which somehow made the whole elaborate decorating process feel completely worth it. That's when I realized these aren't just desserts—they're conversation starters, tiny moments of joy that people remember.
Ingredients
- 1 box (400 g) chocolate cake mix: Start with a reliable brand you know, because quality here sets the foundation for everything else—the fresher the mix, the softer your final cake pops will be.
- Eggs, oil, and water as required by package: Use exactly what the box calls for; don't get creative here because precision matters for the right texture that holds together when rolled.
- 120 g (½ cup) chocolate frosting: Store-bought works beautifully and saves time, but homemade frosting gives you more control over sweetness and texture if you're feeling ambitious.
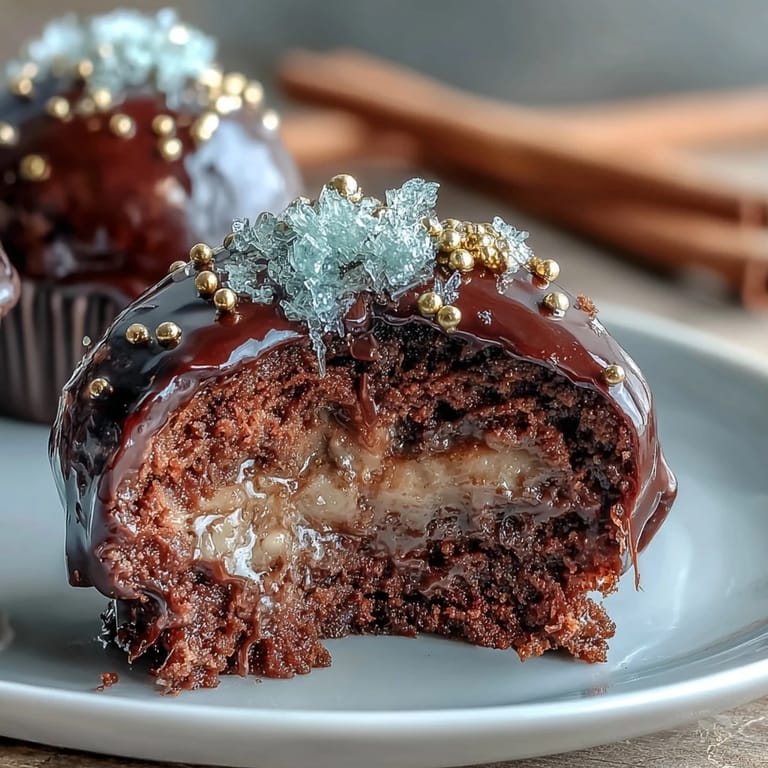
- 400 g (14 oz) black candy melts: These are your "pot," so buy quality melts that don't seize up easily; cheaper versions sometimes become grainy when melted.
- 48 g (2 oz) gold sprinkles or edible gold pearls: This is where the magic happens—the gold makes them unmistakably festive, and pearls create a more sophisticated look than flat sprinkles.
- 24 lollipop sticks: Wood sticks work, but cake pop sticks are slightly thicker and hold better, especially if your pops are on the heavier side.
- 50 g (1.75 oz) white candy melts (optional): Keep these on hand for piping details around the rim if you want to add that extra crafted touch.
- Green fondant or sprinkles for shamrocks: This is your chance to personalize—use whatever green decoration speaks to you, or skip it entirely if you prefer a minimalist look.
Tired of Takeout? 🥡
Get 10 meals you can make faster than delivery arrives. Seriously.
One email. No spam. Unsubscribe anytime.
Instructions
- Bake the chocolate cake:
- Follow the package instructions exactly, then let it cool completely on a rack—this step matters because warm cake turns into a greasy mess when you try to crumble it. I learned this the hard way by trying to rush.
- Create your cake base:
- Crumble the cooled cake into fine, even pieces in a large bowl—think breadcrumbs rather than chunks. The finer you go, the smoother your cake pops will be.
- Mix in the frosting:
- Add the chocolate frosting gradually, mixing with your hands until it holds together like soft clay. You want it to stick without being greasy; if it feels wet, you've added too much.
- Roll the pops:
- Scoop roughly 1.5-inch balls and roll them between your palms until they're smooth, then flatten the tops slightly to resemble actual pot shapes. This shaping step is oddly meditative and much easier than it sounds.
- Chill before decorating:
- Spread them on a parchment-lined tray and refrigerate for 30 minutes—cold cake pops stay intact when you dip them, while room-temperature ones can slip right off the stick.
- Melt and dip the sticks:
- Heat your black candy melts according to package directions, then dip each lollipop stick into the melted coating and insert it halfway into a cake ball. This anchors everything before the full dip.
- Set the sticks:
- Let them sit in the fridge for 10 minutes so the coating hardens and the stick won't wiggle free during the next dip. Patience here saves frustration later.
- Full coating dip:
- Dip each pop completely into the black candy melts, then hold it upright and gently rotate it so excess drips away—you want a smooth, even coat. Stand each one in a styrofoam block or cake pop stand to set.
- Top with gold immediately:
- Before the black coating sets completely, sprinkle or press your gold decorations onto the top while it's still tacky. The timing here is crucial; wait too long and they won't stick.
- Add finishing touches:
- Once the black coating sets, you can pipe a decorative rim with white candy melts if you want that extra polish, or add green fondant shamrocks for seasonal flair. Let everything harden completely before handling.
 Merken
 There was one afternoon when a friend brought these to a casual coffee date, and a stranger at the next table asked where she'd bought them—watching my friend explain that she'd made them by hand was such a quiet, perfect moment of pride. Food doesn't have to be complicated to feel special; sometimes it just needs to look a little magical.
The Magic of Presentation
These cake pops work because they tell a story without saying a word. The moment someone sees them, their brain makes the connection to luck, celebration, and St. Patrick's Day magic all at once. I've noticed that people eat them more slowly than regular desserts, examining them from different angles, which suggests you've created something memorable rather than just another treat.
Timing and Make-Ahead Strategy
You can make the cake and frosting mixture up to two days ahead, storing it in an airtight container in the fridge, then shape and decorate them the day before your event. This flexibility means you're never scrambling last-minute, and the final product tastes just as fresh. I've also discovered that letting them sit overnight allows the coating to set even harder, making them easier to transport without damage.
Customizing Your Pots of Gold
Once you master this base recipe, you can play with variations that feel entirely your own. Try different colored candy coatings, experiment with sprinkle colors beyond gold, or dip half of each pop for a two-tone effect that catches light beautifully. Here are a few quick ideas to keep in mind:
- Use different cake flavors like vanilla or red velvet if chocolate isn't your celebration cake of choice.
- Swap the gold sprinkles for pearl dust or edible glitter for a subtly different shimmer effect.
- Keep extra candy melts warming in small bowls so you can touch up any spots that crack during handling.
 Merken
 These little pots of gold have become my favorite thing to make when I want to give something that feels thoughtful without requiring advanced baking skills. There's real joy in making something that looks like it took hours but actually came together in your own kitchen.
Rezept-Fragen & Antworten
- → Wie forme ich die Kuchenbällchen richtig?
Nach dem Mischen der Kuchenkrümel mit der Schokoladencreme formen Sie etwa 24 gleich große Kugeln von ca. 1,5 Zoll Durchmesser. Die Oberseite kann leicht plattgedrückt werden, um die Optik eines kleinen Topfes zu erzeugen.
- → Wie verhindere ich, dass die Bällchen beim Eintauchen zerbrechen?
Stellen Sie sicher, dass die Kuchenbällchen gut gekühlt sind, bevor Sie sie in die geschmolzenen Süßigkeiten tauchen. Das Kühlen sorgt für Festigkeit und Stabilität.
- → Welche Alternativen gibt es zu den goldfarbenen Streuseln?
Essbare Goldperlen oder goldener Zucker eignen sich gut. Auch kleine Schokoladenstückchen oder grüne Deko-Elemente können verwendet werden, um ein ähnliches festliches Aussehen zu erzielen.
- → Kann ich die Bällchen im Voraus zubereiten?
Ja, die Kuchenbällchen lassen sich bis zu 3 Tage luftdicht bei Raumtemperatur aufbewahren. So sind sie ideal für die Vorbereitung vor Festen.
- → Wie kann ich die Bällchen glutenfrei herstellen?
Verwenden Sie eine glutenfreie Kuchenmischung und achten Sie darauf, dass Dekorationen und Süßigkeiten ebenfalls glutenfrei sind.